
Previously in this series we have learned about views and collection. Now lets learn about creating nested views based on a collection.
Most if not all of the concepts learned in the previous Re-Learning Backgone.js tutorials will be used in this blog post. As in previous posts, we will start-off very simple and take very small steps to get to our end goal. The reason to take all these steps is to make sure each addition to our solution works. This will be a 7 part post.
For this post our end goal is to create a very simple list of movies. Each individual movie displayed will be managed by an individual Backbone view. There will be another view that creates and manages the child views. I have bigger plans than this, but first wanted to do something simple.

********************************************************************************
We will have many pieces that will make-up the complete solution. So, in this first part of the tutorial we will stub the major parts out the web page.
<html >
<head>
    <title></title>
    <script src="/scripts/jquery-1.8.3.js" type="text/javascript"></script>
   	<script src="/scripts/underscore.js" type="text/javascript"></script>
	<script src="/scripts/backbone.js" type="text/javascript"></script>
    <style >
        div .table {display: table; border:#505050 solid 1px; padding: 5px;}
        div .tableRow {display: table-row}
        div .tableCell {display: table-cell; border:#737373 solid 1px; padding: 5px;}
    </style>
</head>
<body>
    <div id="container-movieList" class="table"></div>

    <script type="text/template" id="template-movieItem">
        <div id="name" class="tableCell"><%=Name%></div>
        <div id="releaseYear" class="tableCell"><%=ReleaseYear%></div>
    </script>

    <script type="text/javascript">
        //Stub out at a high level
        //**************************************************************************
        var Movie = Backbone.Model.extend({});

        var Movies = Backbone.Collection.extend({
            model: Movie
        });

        //**************************************************************************
        var MovieListView = Backbone.View.extend({
        })

        var MovieItemView = Backbone.View.extend({
        })

        //**************************************************************************
        var myMovies = [
            { "id": "1", "title": "Bag It", "releaseYear": 2010 },
            { "id": "2", "title": "Lost Boy: The Next Chapter", "releaseYear": 2009 },
            { "id": "3", "title": "To Live & Ride in L.A.", "releaseYear": 2010 },
            { "id": "4", "title": "K-ON!: Vol. 1", "releaseYear": 2009 },
            { "id": "5", "title": "Archer: Season 2: Disc 1", "releaseYear": 2011 },
        ];
      </script>
</body>
</html>
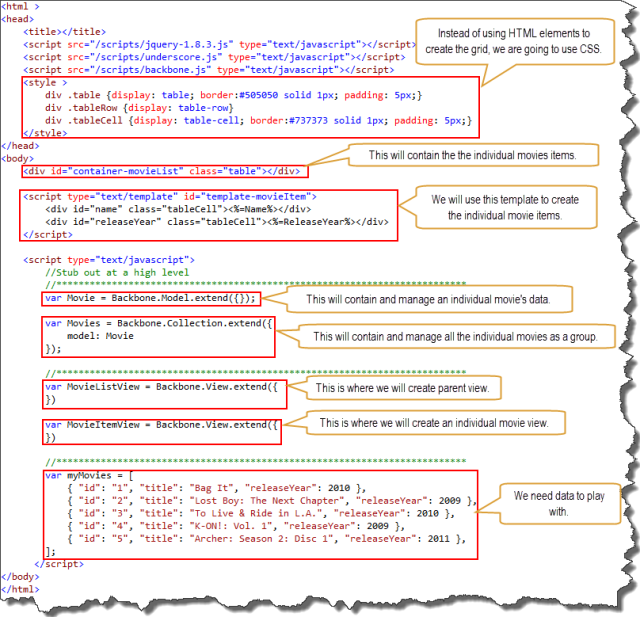
We could use <table>, <tr>, and <td> elements to style our grid, but I believe it’ better to use CSS to style the data. I won’t go into the reasoning here, but there’s a lot of discussion on the subject. I also thought this post would provide a good situation to try out the CSS table display properties. All the new browsers support these properties. Come to find out, IE and Google Chrome renders these examples differently. I use Google Chrome.
This first “div” element is where individual movie views will be added to. This “div” will be managed by a view called “movieListView”.
The template will be used to create each individual Movie view.
The “Movie” class will be used to store and manage an individual movie model.
The “Movies”class will be used to store and manage a group of individual movie models. Notice that is “movies” is plural/
The “MovieListView” class is a view that will manage the div “container-movieList”. All the individual movie views will be added to this view.
The “MovieItemView” class will manage an individual movie element.
Since we’re displaying movies, we will need some data to work with. This is just an array of movies.
********************************************************************************
In this part of the tutorial we will define the individual movie view. We will create a few movie views and manually add them to the DOM.
    <script type="text/javascript">
        //Test an individual MovieItemView works independently of others view
        //**************************************************************************
        var Movie = Backbone.Model.extend({});

        var Movies = Backbone.Collection.extend({
            model: Movie
        });

        //**************************************************************************
        var MovieListView = Backbone.View.extend({
        })

        var MovieItemView = Backbone.View.extend({
            type: "MovieItemView", //for debugging
            template: _.template($("#template-movieItem").html()),
            tagName: "div",
            className: "tableRow",
            //el: since we're setting the tagName, we don't need set the el
            //model: pass model in
            initialize: function () {
                console.log(this.model);
            },
            render: function () {
                var outputHtml = this.template(this.model.toJSON());
                this.$el.html(outputHtml);
                return this;
            }
        })

        //**************************************************************************
        var myMovies = [
            { "id": "1", "title": "Bag It", "releaseYear": 2010 },
            { "id": "2", "title": "Lost Boy: The Next Chapter", "releaseYear": 2009 },
            { "id": "3", "title": "To Live & Ride in L.A.", "releaseYear": 2010 },
            { "id": "4", "title": "K-ON!: Vol. 1", "releaseYear": 2009 },
            { "id": "5", "title": "Archer: Season 2: Disc 1", "releaseYear": 2011 },
        ];
        var movies = new Movies(myMovies)

        var movieItemView1 = new MovieItemView({ model: movies.at(0) });
        $("#container-movieList").append(movieItemView1.render().el);

        var movieItemView2 = new MovieItemView({ model: movies.at(1) });
        $("#container-movieList").append(movieItemView2.render().el);

        var movieItemView3 = new MovieItemView({ model: movies.at(2) });
        $("#container-movieList").append(movieItemView3.render().el);

    </script>
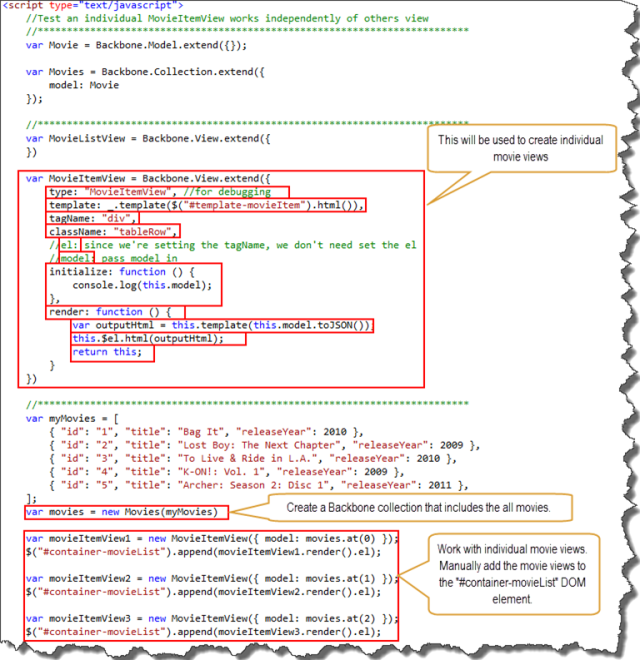
In this example all we are trying to do is display a list of movies. We also want to confirm that the “MovieItemView” works correctly. The way we render the view and assign the view to the DOM is for debugging purposes only.
“MovieItemView” class will be used to create a view for each movie. When we define the “MovieItemView” class we include a property called “type”. The “type” property will be used for debugging later. We set the “type” property to the name “MovieItemView”, which is the same name as the class. Again, this is just for debugging.
Next we declare “template”. The template “#template-movieItem” is compiled and a function is stored to the “template” property.
The property “tagName” is used to identify the type of element that “el” will be created with. “div” is the default value for “tagName”. For clarity we have assigned “tagName” to “div”, even though it’s not needed.
Since we are using CSS to style the view, we assigned the style “tableRow” to “className”. By default “className” is empty.
We will not assign “el”, since “el” will be created from the tagName and className.
I included a comment for “model” just to clarify that it will be passed in. The model will be provided when we create a MovieItemView object.
The “initialize” function doesn’t do much at this time.
In the “render” function, we us the template function and provide the movie model. The template function returns html.
The html that is returned from the template is added to the view “$el”.
Then the view is returned by using “this”. Returning “this” allows us to chain methods together.
Next we create the “movies” object by passing in the myMovies array.
We use the “MovieItemView” class to create the object called “movieItemView1”. During this process we pass in a reference of the first object from the movies collection.
We then manually add the view’s html to the element “#container-movieList”. Later in this tutorial the parent view “MovieListView” will manage this.
We repeat the process three time of adding the movie views to the container.
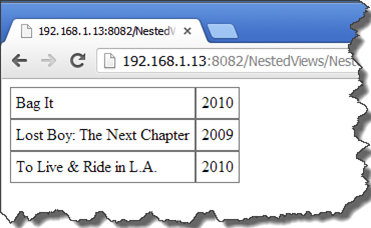
In the results, you should see 3 movies displayed. The primary purpose here is that we make certain the child views perform correctly before we complicate the situation by added the parent view.
********************************************************************************
The view should represent the model’s data that it is associated with. Whenever the model’s data is update, the view(s) that is associated with that model should also be updated. The view and the model should stay in sync.
    <script type="text/javascript">
        //View should monitor Model for changes
        //**************************************************************************
        var Movie = Backbone.Model.extend({});

        var Movies = Backbone.Collection.extend({
            model: Movie
        });

        //**************************************************************************
        var MovieListView = Backbone.View.extend({
        })

        var MovieItemView = Backbone.View.extend({
            type: "MovieItemView", //for debugging
            template: _.template($("#template-movieItem").html()),
            tagName: "div",
            className: "tableRow",
            //el: since we're setting the tagName, we don't need set the el
            //model: pass model in
            initialize: function () {
                this.model.on("change", this.modelChanged, this);
            },
            render: function () {
                var outputHtml = this.template(this.model.toJSON());
                this.$el.html(outputHtml);
                return this;
            },
            modelChanged: function (model, changes) {
                console.log("modelChanged:" + model.get("title"));
                this.render();
            },
        })

        //**************************************************************************
        var myMovies = [
            { "id": "1", "title": "Bag It", "releaseYear": 2010 },
            { "id": "2", "title": "Lost Boy: The Next Chapter", "releaseYear": 2009 },
            { "id": "3", "title": "To Live & Ride in L.A.", "releaseYear": 2010 },
            { "id": "4", "title": "K-ON!: Vol. 1", "releaseYear": 2009 },
            { "id": "5", "title": "Archer: Season 2: Disc 1", "releaseYear": 2011 },
        ];
        var movies = new Movies(myMovies)

        var movieItemView1 = new MovieItemView({ model: movies.at(0) });
        $("#container-movieList").append(movieItemView1.render().el);

        var movieItemView2 = new MovieItemView({ model: movies.at(1) });
        $("#container-movieList").append(movieItemView2.render().el);

        var movieItemView3 = new MovieItemView({ model: movies.at(2) });
        $("#container-movieList").append(movieItemView3.render().el);

        movies.at(0).set({ title: "Star Wars", releaseYear: 1977 });
        movies.at(1).set({ title: "Star Wars - Empire Strikes Back", releaseYear: 1980 });
    </script>


First, we identify that when the model changes the view should represent those changes. In the event declaration we include “this” as the 3rd parameter. The 3rd parameter “this” identifies that when the “modelChanged” method is called that “this” will reference the view when the event was declared. If we do not provide “this” as the 3rd parameter and the method “modelChanged” is called, it is possible that “this” in the method “modelChange” will not reference the view. “this” sucks; trying to understand “this” and also trying to explain it. Maybe I should do a post on “this”.
The method “modelChanged” does not do much. It logs the movie title to the browser console. And then calls render. The “this” in “this.render()” is important. When we defined the event earlier we passed “this” as the 3rd argument. When we passed in “this”, and “this” represented the view, we identified that when “modelChanged” is called that the context of “this” should be the view. Again, “this” sucks.
At the bottom of the JavaScript we change the movie model’s data. Since we created an event that identified when the model data is updated (change), the “modelChanged” method is called.
As you can see in the results the first 2 movies views have been changed.
As a diversion, remove the 3rd parameter “this” from the event declaration and refresh your page. In the “methodChanged” event add “console.log(this)”. What do you get? Before moving on to the next step, remove these changes that I just mentioned.
********************************************************************************
If an action occurs on an individual movie view, like a click, lets do something. So far we have learned that a view manages a DOM element. A view can be notified of actions that occur on the DOM element that it manages. In this example when a user clicks on an individual view, log the action to the browser console.
 <script type="text/javascript">
        //The Movie View can monitor its own DOM events
        //**************************************************************************
        var Movie = Backbone.Model.extend({});

        var Movies = Backbone.Collection.extend({
            model: Movie
        });

        //**************************************************************************
        var MovieListView = Backbone.View.extend({
        })

        var MovieItemView = Backbone.View.extend({
            type: "MovieItemView", //for debugging
            template: _.template($("#template-movieItem").html()),
            tagName: "div",
            className: "tableRow",
            //el: since we're setting the tagName, we don't need set the el
            //model: pass model in
            initialize: function () {
                this.model.on("change", this.modelChanged, this);
            },
            events: {
                "click": "viewClicked"
            },
            render: function () {
                var outputHtml = this.template(this.model.toJSON());
                this.$el.html(outputHtml);
                return this;
            },
            modelChanged: function (model, changes) {
                console.log("modelChanged:" + model.get("title"));
                this.render();
            },
            viewClicked: function (event) {
                console.log("viewClicked: " + this.model.get("title"));
            }
        })

        //**************************************************************************
        var myMovies = [
            { "id": "1", "title": "Bag It", "releaseYear": 2010 },
            { "id": "2", "title": "Lost Boy: The Next Chapter", "releaseYear": 2009 },
            { "id": "3", "title": "To Live & Ride in L.A.", "releaseYear": 2010 },
            { "id": "4", "title": "K-ON!: Vol. 1", "releaseYear": 2009 },
            { "id": "5", "title": "Archer: Season 2: Disc 1", "releaseYear": 2011 },
        ];
        var movies = new Movies(myMovies)

        var movieItemView1 = new MovieItemView({ model: movies.at(0) });
        $("#container-movieList").append(movieItemView1.render().el);

        var movieItemView2 = new MovieItemView({ model: movies.at(1) });
        $("#container-movieList").append(movieItemView2.render().el);

        var movieItemView3 = new MovieItemView({ model: movies.at(2) });
        $("#container-movieList").append(movieItemView3.render().el);

        movies.at(0).set({ title: "Star Wars", releaseYear: 1977 });
        movies.at(1).set({ title: "Star Wars - Empire Strikes Back", releaseYear: 1980 });
    </script>


The MovieItemView has an “events” hash. This provides a simple way of binding DOM events to the view. In this example, we identified that when the views DOM element is “click”ed, then call the method “viewClicked”. The “click” is a DOM event.
The “viewClicked” method logs to the browser console a string and the “title” of the movie. Remember that an individual view is associated with an individual model. We are passing in an “event” to “viewClicked”, but we are not using the “event”. I provided the “event” just so that you are aware that it exists.
In the results we see the 3 movies. Also from the previous example, we are updating the first two movies. But the major part of this is example is that the user needs to click on the different movies. The movie that is clicked should be logged to the browser console.
********************************************************************************
Since we have confirmed that individual views work, lets start playing with the parent view called “MovieListView”. You may be disappointed, but we will not display views in this example. There are a few concepts that we need to learn first before we start display child views from the parent views.
The “MovieListView” our parent view and will manage the individual child views, but this will be done in the next example. In this example we are going to learn about how the parent view (“MovieListView”) works with the collection of models.
    <script type="text/javascript">
        //Create MovieListView and loop through movies
        //**************************************************************************
        var Movie = Backbone.Model.extend({});

        var Movies = Backbone.Collection.extend({
            model: Movie
        });

        //**************************************************************************
        var MovieListView = Backbone.View.extend({
            type: "MovieListView", //for debugging
            el: "#container-movieList",  //the view should be decoupled from the DOM, but for this example this will do.
            //collection:  This will be passed in during initialization
            initialize: function () {

            },
            render: function () {
                _.each(this.collection.models, this.processMovie,this);
            },
            processMovie: function(movie){
                console.log("")
                console.log(this.type)
                console.log(movie.get("title"));
            }
        })

        var MovieItemView = Backbone.View.extend({
                //We don't need a veiw for this example.
        })

        //**************************************************************************
        var myMovies = [
            { "id": "1", "title": "Bag It", "releaseYear": 2010 },
            { "id": "2", "title": "Lost Boy: The Next Chapter", "releaseYear": 2009 },
            { "id": "3", "title": "To Live & Ride in L.A.", "releaseYear": 2010 },
            { "id": "4", "title": "K-ON!: Vol. 1", "releaseYear": 2009 },
            { "id": "5", "title": "Archer: Season 2: Disc 1", "releaseYear": 2011 },
        ];
        var movies = new Movies(myMovies)
        var movieListView = new MovieListView({ collection: movies });
        movieListView.render();
    </script>


For the most part the “MovieListView” view is a basic view.
The “type” property is for debugging. When we loop through the collection of movies in the “processMovie” method we will log the value of “type”.
“el” points to the DOM with the id of “container-movieList”. Ignore the “el” for the time being, it’s will be used in the next example.
The “render” method we will loop through each movie in the collection and for each movie call the “processMovie” method. For each iteration of the loop, the method “processMovie” will be called and the movie for that iteration will be passed in. Here’s “this” again”. “this” sucks. Maybe a better way of thinking about “this”, is when the “MovieListView” is used to create a new object, “this” will reference the new object. When we create “movieListView”, “this” references “movieListView”. You may have a question about “_.each”. “_.each” is a function in underscore.js that allows us a simple way to loop through a collection. You can find more about this here: http://underscorejs.org/#each.
Later in the code we create the “movieListView”. When we do this, we pass-in the movies collection.
Then we call “render” on “movieListView”.
As you can see in the results, the “movieListView.render()” loops through the collection and logs each movie to the browser console.
For extra credit, remove “, this” from the render function and refresh the page. You will notice that “this.type” will log “undefined”. Before you move on, put “, this” back.
“_.each(this.collection.models, this.processMovie);”

*********************************************************************************************
It took a little while to get here, but I believe it was beneficial that we took small steps to get to this point.
In the previous example, in the “processMovie” method, we logged the results to the browser console. In this example, we will create a child view for each movie in the collection. Each of the child views will be added to the parent view. You noticed in this example that we didn’t change anything other than the code in the “processMovie” method.
In the previous examples the child views were able to operate without a parent view. It’s important to note that with the addition of the parent view, the child views did not change. By creating and testing the child views first, we removed a lot of complexities and provided validation that individual child views operated correctly.
Here is the complete solution.
<html >
<head>
    <title></title>
    <script src="/scripts/jquery-1.8.3.js" type="text/javascript"></script>
   	<script src="/scripts/underscore.js" type="text/javascript"></script>
	<script src="/scripts/backbone.js" type="text/javascript"></script>
    <style >
        div .table {display: table; border:#505050 solid 1px; padding: 5px;}
        div .tableRow {display: table-row}
        div .tableCell {display: table-cell; border:#737373 solid 1px; padding: 5px;}
    </style>
</head>
<body>
    <div id="container-movieList" class="table"></div>
    <script type="text/template" id="template-movieItem">
        <div id="title" class="tableCell"><%=title%></div>
        <div id="releaseYear" class="tableCell"><%=releaseYear%></div>
    </script>

    <script type="text/javascript">
        //Create MovieListView and loop through movies
        //**************************************************************************
        var Movie = Backbone.Model.extend({});

        var Movies = Backbone.Collection.extend({
            model: Movie
        });

        //**************************************************************************
        var MovieListView = Backbone.View.extend({
            type: "MovieListView", //for debugging
            el: "#container-movieList",  //the view should be decoupled from the DOM, but for this example this will do.
            //collection:  This will be passed in during initialization
            initialize: function () {

            },
            render: function () {
                _.each(this.collection.models, this.processMovie, this);
                return this;
            },
            processMovie: function(movie){
                var childMovieItemView = new MovieItemView({ model: movie });
                childMovieItemView.render();
                this.$el.append(childMovieItemView.el);
            }
        })

        var MovieItemView = Backbone.View.extend({
            type: "MovieItemView", //for debugging
            template: _.template($("#template-movieItem").html()),
            tagName: "div",
            className: "tableRow",
            //el: since we're setting the tagName, we don't need set the el
            //model: pass model in
            initialize: function () {
                this.model.on("change", this.modelChanged, this);
            },
            events: {
                "click": "viewClicked"
            },
            render: function () {
                var outputHtml = this.template(this.model.toJSON());
                this.$el.html(outputHtml);
                return this;
            },
            modelChanged: function (model, changes) {
                console.log("modelChanged:" + model.get("title"));
                this.render();
            },
            viewClicked: function (event) {
                console.log("viewClicked: " + this.model.get("title"));
            }
        })

        //**************************************************************************
        var myMovies = [
            { "id": "1", "title": "Bag It", "releaseYear": 2010 },
            { "id": "2", "title": "Lost Boy: The Next Chapter", "releaseYear": 2009 },
            { "id": "3", "title": "To Live & Ride in L.A.", "releaseYear": 2010 },
            { "id": "4", "title": "K-ON!: Vol. 1", "releaseYear": 2009 },
            { "id": "5", "title": "Archer: Season 2: Disc 1", "releaseYear": 2011 },
        ];
        var movies = new Movies(myMovies)
        var movieListView = new MovieListView({ collection: movies });
        movieListView.render();
    </script>
</body>
</html>


The “el” identifies an existing DOM element with the id of “container-movieList”. This view will reference and manage the DOM element.
It’s a best practice to return “this” in the render function. By returning “this” we can do chaining. I should have added “return this” in the previous example, but didn’t want to redo all the work for the image. In these examples we don’t do chaining, so it does make a difference if we have it or not. But again, it’s probably a best practice to include it.
From the previous example, remember that the render function use “_.each” to loop through each individual movie in the collection. Per iteration, the “processMovie” method is called and the individual movie is passed to the method for that iteration. Then the “processMovie” method creates a new “MovieItemView” object, it passes in a movie model to the new child view. . Then we append the child view’s “el” to the parent view el, which will add the child view to the “container-movieList” DOM element.
We can see in the results that complete collection is displayed. If you click on anyone of the items in the browser an event will be fire and logged to the browser console.
Again it’s important to note that we did not change any of the child view (“MovieItemView”) code. We should be able to work with the child view independently and without consideration the parent view.

Really awesome, thank you! I’m very glad I took the time to go through all of these tutorials. They’ve really helped to clarify backbone considerably.
Very well written. Couldn’t have been simpler. I just had working knowledge of javascript, and suddenly now the backbone and underscore.js code makes sense for me. Thank you very much.